
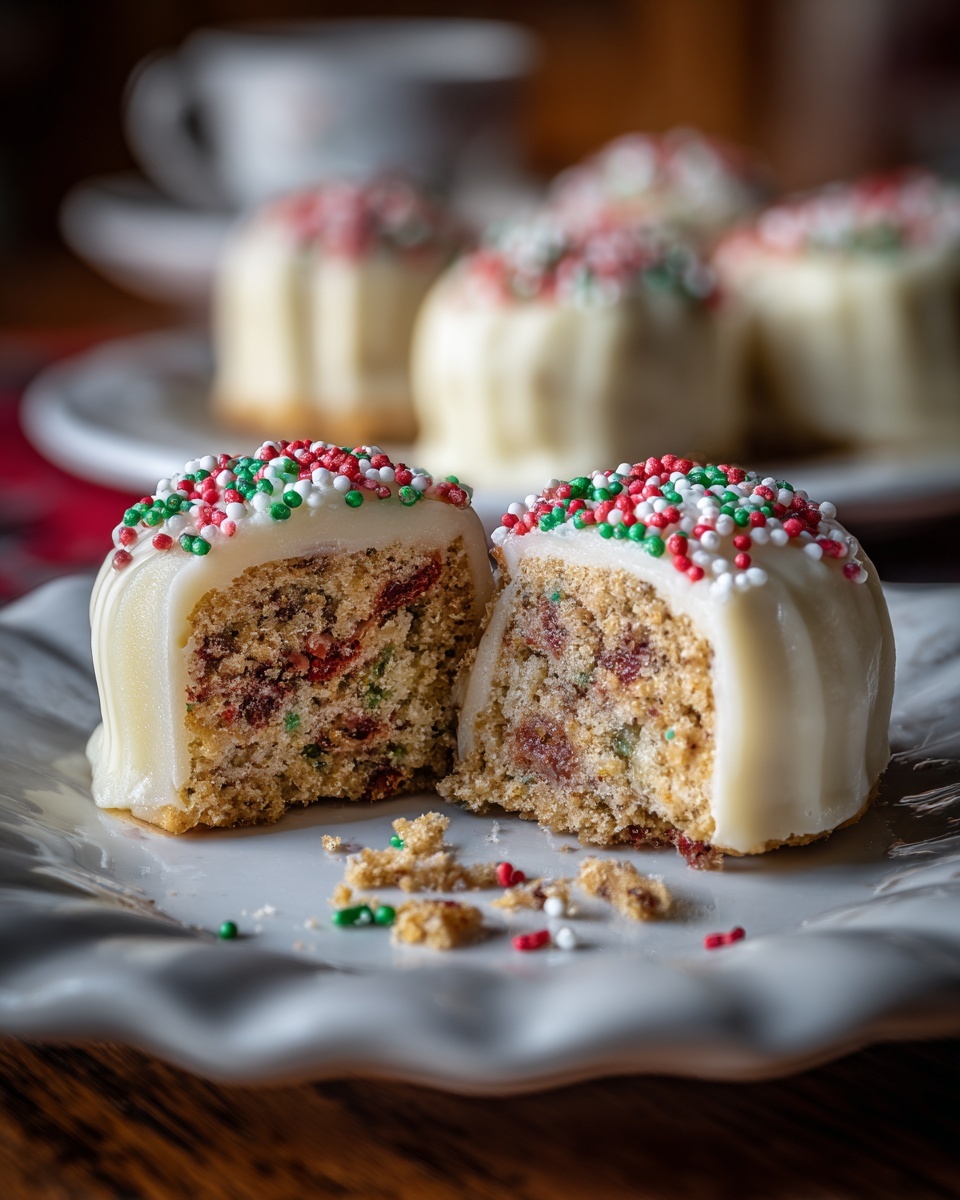
If you are looking for a delightfully festive treat that brings a burst of holiday cheer in every bite, the Little Debbie Christmas Cake Balls Recipe is an absolute must-try. These charming little cake balls combine the nostalgic flavor of Little Debbie Christmas Tree Cakes with creamy cream cheese and a smooth white chocolate coating that’s perfect for holiday parties, cozy evenings, or as a sweet gift to spread some joy. They’re easy to make, incredibly fun to decorate, and so irresistibly delicious that they’ll quickly become your new favorite seasonal indulgence.
Ingredients You’ll Need
This recipe is wonderfully simple, relying on just a handful of ingredients that work together to create an unforgettable texture and taste combination. Each component plays a crucial role, whether it’s the festive cake base, the creamy binder, or the sweet coating that ties it all together beautifully.
- Little Debbie Christmas Tree Cakes (10 cakes): These are the star of the show, providing a moist, spiced flavor and colorful festive layers that make the cake balls shine.
- Cream cheese, 1/2 cup softened: Adds a luscious creaminess that holds the crumbled cake together perfectly without overpowering the flavor.
- Vanilla extract, 1/2 teaspoon: A subtle hint of vanilla that enhances the sweetness and depth of the mixture.
- White chocolate chips, 1 cup: Offers a smooth, sweet coating that contrasts beautifully with the cake’s texture and flavor.
- Vegetable oil, 1 tablespoon: Keeps the melted white chocolate glossy and easy to dip the cake balls.
- Red and green sprinkles (optional): For adding a festive, colorful sparkle that makes these cake balls even more eye-catching and fun.
How to Make Little Debbie Christmas Cake Balls Recipe
Step 1: Crumble the Cake
Start by breaking down those festive Little Debbie Christmas Tree Cakes into fine crumbs. Using your hands or a fork, crumble the cakes into a large bowl until you have a consistent crumb texture. This is what forms the flavorful base of your cake balls, so aim for small, even pieces.
Step 2: Mix With Cream Cheese and Vanilla
Next, add the softened cream cheese and a touch of vanilla extract to the cake crumbs. Mix everything thoroughly until the mixture becomes smooth and holds together when pressed. This binding step is key to making sure your cake balls keep their shape and have that perfect soft bite.
Step 3: Shape Into Balls
Using a tablespoon or your hands, scoop out equal portions of the cake mixture and roll them into neat balls. Place them on a parchment-lined baking sheet to keep things tidy. This is where the magic starts to take shape, and you’ll notice the mixture sticks beautifully.
Step 4: Melt the White Chocolate
In a microwave-safe bowl, combine white chocolate chips and vegetable oil. Microwave in 20 to 30-second intervals, stirring between each, until the chocolate is fully melted and silky smooth. The vegetable oil helps make the coating glossy and easier to work with.
Step 5: Coat the Cake Balls
Dip each cake ball into the melted white chocolate using a fork to fully coat it. Allow any excess chocolate to drip back into the bowl before placing the coated balls back onto the parchment paper. This coating will harden into a luscious shell that complements the soft inside.
Step 6: Decorate and Chill
If you want to add a festive touch, sprinkle red and green decorations on top of the freshly coated balls. Then, transfer the tray to the refrigerator for at least 30 minutes to let the chocolate set firmly. This chilling step helps lock in the flavors and creates that satisfying snap when you bite in.
Step 7: Serve and Enjoy
Once chilled, your Little Debbie Christmas Cake Balls Recipe treats are ready to be served. Whether you enjoy them at room temperature or straight from the fridge, they deliver a festive flavor and texture combination that’s sure to spread Christmas joy.
How to Serve Little Debbie Christmas Cake Balls Recipe

Garnishes
To elevate your presentation, consider using more festive sprinkles, edible glitter, or even a drizzle of contrasting dark or milk chocolate. These little details make your cake balls feel extra special and perfect for any holiday gathering.
Side Dishes
These cake balls are perfect alongside a warm cup of coffee, hot cocoa, or a glass of eggnog. They also pair wonderfully with a simple fruit platter or holiday cookies when you want to offer guests a variety of festive dessert options.
Creative Ways to Present
Try arranging your cake balls on a tiered dessert stand or serving them in mini cupcake liners for an elegant touch. You can even skewer them with festive picks or place them in decorative holiday boxes if you plan to gift them. Whatever you choose, they’re sure to brighten up the display table.
Make Ahead and Storage
Storing Leftovers
Store leftover Little Debbie Christmas Cake Balls in an airtight container in the refrigerator. They will keep well for up to a week, maintaining their moisture and flavor so you can enjoy them long after the first serving.
Freezing
You can freeze these cake balls by placing them in a single layer on a baking sheet until firm, then transferring them to a freezer-safe container. They’ll keep for up to three months, making them a great make-ahead treat for any holiday craving.
Reheating
For best texture, allow frozen cake balls to thaw in the refrigerator overnight. Avoid microwaving as this can affect the chocolate coating’s texture. If you want them softer, simply leave them at room temperature for a little while before serving.
FAQs
Can I use other flavors of Little Debbie cakes for this recipe?
Absolutely! While the Christmas Tree Cakes add festive color and flavor, you can experiment with other Little Debbie varieties like Zebra Cakes or Swiss Roll for a delicious twist on this recipe.
Do I have to use white chocolate for the coating?
White chocolate is recommended for the sweet and creamy contrast, but feel free to use milk or dark chocolate if you prefer a richer or less sweet coating. Just adjust the amount of oil to get the right consistency for dipping.
How do I prevent the cake balls from falling apart?
The key is to mix the crumbs and cream cheese until the mixture binds well and holds its shape when pressed. If the mixture is too dry, add a bit more cream cheese; if too soft, try chilling it before shaping.
Can these cake balls be made vegan or dairy-free?
To make a dairy-free version, substitute the cream cheese with a dairy-free alternative and use dairy-free white chocolate chips. The texture may vary slightly, but the festive spirit will remain!
What’s the best way to transport these cake balls to a holiday party?
Use a sturdy container with parchment paper lining, and keep them chilled until just before serving. Individual cupcake liners help keep them separated and make transport cleaner and easier.
Final Thoughts
Whipping up the Little Debbie Christmas Cake Balls Recipe is a festive treat that’s as joyful to make as it is to eat. With simple ingredients and easy steps, these cake balls bring holiday magic to your kitchen and smiles to everyone’s faces. Trust me, once you try them, they’ll become a beloved staple of your holiday dessert lineup!
Print
Little Debbie Christmas Cake Balls Recipe
- Prep Time: 15 minutes
- Cook Time: 0 minutes
- Total Time: 45 minutes
- Yield: 12 servings
- Category: Dessert
- Method: No-Cook
- Cuisine: American
Description
These Little Debbie Christmas Cake Balls are a delightful holiday treat made by combining festive Christmas Tree Cakes with cream cheese, then coated in smooth white chocolate and decorated with red and green sprinkles. Perfect for holiday parties or a sweet seasonal snack, these cake balls are easy to make and wonderfully festive.
Ingredients
Base
- 1 box Little Debbie Christmas Tree Cakes (10 cakes)
- 1/2 cup cream cheese, softened
- 1/2 teaspoon vanilla extract
Coating
- 1 cup white chocolate chips
- 1 tablespoon vegetable oil
Decoration (Optional)
- Red and green sprinkles
Instructions
- Crumble the Cake: Begin by crumbling the Little Debbie Christmas Tree Cakes into a large bowl. Use your hands or a fork to break them into fine crumbs, making sure there are no large chunks left.
- Mix: Add the softened cream cheese and vanilla extract to the cake crumbs. Mix thoroughly using a spoon or your hands until the mixture is smooth and cohesive enough to hold its shape when pressed together.
- Shape: Scoop tablespoon-sized portions of the mixture and roll them into balls using your hands. Place the formed balls on a baking sheet lined with parchment paper to prevent sticking and facilitate cleanup.
- Melt Chocolate: In a microwave-safe bowl, combine the white chocolate chips and vegetable oil. Microwave in 20-30 second intervals, stirring well each time, until the chocolate is fully melted and smooth.
- Coat: Using a fork or dipping tool, dip each cake ball into the melted white chocolate, ensuring it is evenly coated. Allow any excess chocolate to drip off, then carefully place the coated cake balls back onto the parchment-lined baking sheet.
- Decorate: While the chocolate is still wet, sprinkle red and green sprinkles over the coated cake balls to add a festive touch, if desired.
- Chill: Refrigerate the cake balls for at least 30 minutes to let the white chocolate coating fully harden and set.
- Serve: Enjoy the cake balls chilled directly from the refrigerator or allow them to come to room temperature before serving for a softer texture.
Notes
- Make sure the cream cheese is softened to room temperature for easier mixing and a smoother texture.
- If white chocolate chips are not available, white candy melts can be used as an alternative.
- The vegetable oil helps to thin the chocolate for easier coating; adjust the amount to achieve desired consistency.
- Store leftovers in an airtight container in the refrigerator to maintain freshness for up to one week.
- For gluten-free or different dietary adaptations, consider using gluten-free cake options instead of the standard Christmas Tree Cakes.


